Rotator Cuff Repair ORT052
Rotator Cuff Repair Transcript
Rotator Cuff Repair
Dr. Cal Shipley: This is Dr. Cal Shipley with a review of rotator cuff tear and repair.
Anatomy of the Rotator Cuff
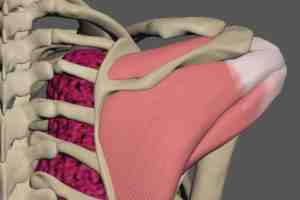
Let’s start with a review of rotator cuff anatomy and a tear of the supraspinatus tendon. The rotator cuff is a group of four muscles which help to stabilize the shoulder joint and allow for its extensive range of motion. Each of the four muscles are attached to both the scapula and the head of the humerus. The four muscles are named supraspinatus, infraspinatus, teres minor, and subscapularis.
Rotator Cuff Muscle Attachments
Now, let’s take a look at the anatomical locations and attachments of the four rotator cuff muscles.
Subscapularis Muscle
Located on the head of the humerus are the greater and lesser tubercles. The subscapular fossa is located on the interface of the scapula. The subscapularis muscle attaches to the subscapular fossa and the lesser tubercle of the humerus.
Supraspinatus Muscle
Attached to the supraspinous fossa of the scapula and the greater tubercle of the humerus is the supraspinatus muscle.
Infraspinatus Muscle
Attached to the infraspinous fossa of the scapula and the greater tubercle of the humerus is the infraspinatus muscle.
Teres Minor
Attached to the lateral outer border of the scapula and the greater tubercle of the humerus is teres minor.
Rotator Cuff Injury
Of the four muscles in the rotator cuff muscle group, the most commonly injured is the supraspinatus, and, in particular, its tendon.
Function of the Supraspinatus Muscle
The supraspinatus muscle plays a major role in abduction of the arm.
The muscle must apply considerable leverage to the head of the humerus in order to accomplish abduction, and, as a result, the tendon is placed under considerable stress. With age, the tendon may atrophy and tear under the load of repeated normal abduction. A single episode of trauma may result in a tendon tear, or a series of micro-tears may occur as a result of repetitive strenuous use, for example, in athletes or construction workers. Supraspinatus tendon tears may also be partial or full-thickness.
Supraspinatus Tendon Tear
For the purposes of this presentation, I’m going to be portraying a typical partial thickness tear of the tendon. Switching to a cross-section view reveals an 80% partial thickness tear located on the underside of the tendon. The dashed line indicates the length and location of the tear.
Rotator Cuff Repair
Now that we’ve defined the rotator cuff supraspinatus tendon tear, let’s look at the arthroscopic repair procedure.
Insertion of Posterior Trocar and Camera
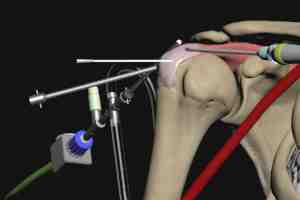
To begin, a needle is inserted into the shoulder joint from the back. The location of the needle tip within the joint is confirmed by fluoroscopy. The needle is removed, and a hollow cylindrical metal tube known as a trocar is inserted into the joint along the tissue path created by the needle. The arthroscopic camera is inserted into the joint through the trocar. The camera serves as the surgeon’s eyes throughout the repair procedure.
In this view, the joint space is bracketed by the head of the humerus above and the scapula below. The turbulence is caused by a steady flow of saline which is pumped through the joint throughout the procedure in order to keep the operative field clear of blood and debris.
Insertion of Anterior Trocar and Shaver
Guided by the camera, a needle is inserted into the shoulder joint from the front. The needle is removed, and a solid blunt trocar is inserted to create a tunnel between the skin surface and the shoulder joint.
The trocar is removed and a shaving tool is inserted. The shaving tool is used to remove redundant tissue within the joint and more clearly expose the operative field.
Location and Marking of the Tendon Tear
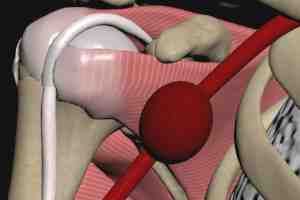
The 80% partial thickness tear of the supraspinatus tendon is visualized by the arthroscopic camera. A camera-guided needle is inserted to mark the precise location of the tear. Throughout the procedure, the surgeon must be cognizant of the location of the axillary artery so as not to inadvertently injure it.
Beneath the acromion bone of the scapula lies the subacromial bursa. This bursa will be removed during the procedure in order to improve access to the supraspinatus tendon.
The camera is now repositioned so that the surgeon can view the area of tendon repair. The shaver is also repositioned so that it may be used during the repair. A trocar is now inserted under camera guidance and its tip placed at the area of repair. The shaver is now used to remove the subacromial bursa.
Conversion to Full Thickness Tear
The dashed line indicates the length and location of the partial thickness tear located on the underside of the supraspinatus tendon. In order to accomplish the repair, the partial thickness tear must be converted to a full-thickness tear.
Decortication and Creation of Starter Hole for Anchor
A burr tool is used to remove the top layer of bone beneath the tear. This is known as decortication.
An awl is used to create a starter hole for the anchor which will reattach the supraspinatus tendon to the humerus.
A marker on the awl is used to create a hole that is 1 centimeter deep. Here is the tip of the awl as viewed by the surgeon, located at the surface of the head of the humerus prior to insertion. The awl is then advanced into the head of the humerus until the 1-centimeter mark on its shaft can be seen. This ensures that the awl is not inserted too deeply, which can result in fracturing of the bone. The awl is removed.
Anchor Placement
Under camera guidance, a plastic anchor is inserted into the starter hole created by the awl.
Here is how anchor insertion appears viewed through the arthroscopic camera. The anchor is inserted until its top is flush with the surface of the humerus. The shaft of the anchor tool is then removed. The anchor has pre-attached sutures, which will be used to affix the supraspinatus tendon to the humeral head. The surgeon then applies gentle tension to the sutures to test the anchor’s grip on the bone. If the patient’s bone is too soft, as may occur with advanced age or osteoporosis, the anchor will pull free.
A new 1-centimeter starter hole is created in a location slightly removed from the initial attempt. The awl is removed, and a new anchor is inserted. This time, the surgeon will insert the anchor until he feels resistance, indicating an area of stronger bone. The placement of the new anchor is tested and found to be stable. The anchor sutures are used to attach the tendon tear to the decorticated humeral bone, and the repair is complete.
Cal Shipley, M.D. copyright 2020


